
If you have built a managed kubernetes cluster in any one of the public clouds(AWS, GCP, Azure, or even Digital Ocean) you have probably fallen in love with the ability to deploy a load balancer easily for your application to a public IP. This is a critical component(at least in my opinion) to utilizing kubernetes in an enterprise environment. Sure you could use a daemon set that ensures its built on each node, and then use a service mesh and then load balance that with an external LB, but who has the time and people. Its so much easier to just set our “type” of service to “LoadBalancer” and be off and running. In the public cloud this deploys a number of services normally including a public IP to expose the application to the public. Since we’re just using a basic raspberry pi, we’re going to be using MetalLB to do this for us, and expose a range of IP’s that are available on our local network.
How does this work?(Taken Directly from MetalLB website)
Address allocation
in a cloud-enabled Kubernetes cluster, you request a load-balancer, and your cloud platform assigns an IP address to you. In a bare metal cluster, MetalLB is responsible for that allocation.
MetalLB cannot create IP addresses out of thin air, so you do have to give it pools of IP addresses that it can use. MetalLB will take care of assigning and unassigning individual addresses as services come and go, but it will only ever hand out IPs that are part of its configured pools.
How you get IP address pools for MetalLB depends on your environment. If you’re running a bare metal cluster in a colocation facility, your hosting provider probably offers IP addresses for lease. In that case, you would lease, say, a /26 of IP space (64 addresses), and provide that range to MetalLB for cluster services.
Alternatively, your cluster might be purely private, providing services to a nearby LAN but not exposed to the internet. In that case, you could pick a range of IPs from one of the private address spaces (so-called RFC1918 addresses), and assign those to MetalLB. Such addresses are free, and work fine as long as you’re only providing cluster services to your LAN.
Or, you could do both! MetalLB lets you define as many address pools as you want, and doesn’t care what “kind” of addresses you give it.
External announcement
Once MetalLB has assigned an external IP address to a service, it needs to make the network beyond the cluster aware that the IP “lives” in the cluster. MetalLB uses standard routing protocols to achieve this: ARP, NDP, or BGP.
Lets get MetalLB up and get going!
So MetalLB is very simple to get going. You start by deploying the needed security policies, daemonsets, and deployment, for the solution to be started, then you set a configMap to set the needed private ip range for it to utilize. First you run the command to build:
kubectl apply -f https://raw.githubusercontent.com/metallb/metallb/v0.9.6/manifests/namespace.yaml
kubectl apply -f https://raw.githubusercontent.com/metallb/metallb/v0.9.6/manifests/metallb.yaml
#On First Install Only
kubectl create secret generic -n metallb-system memberlist --from-literal=secretkey="$(openssl rand -base64 128)"
The initial apply creates the namespace, then the 2nd deploys the needed manifest(security policies, Daemonset,Deployment), and the third creates a secret for the solution. The ConfigMap needs to be created before applied. Here is what it looks like:
apiVersion: v1
kind: ConfigMap
metadata:
  namespace: metallb-system
  name: config
data:
  config: |
    address-pools:
    - name: default
      protocol: layer2
      addresses:
      - **INSERT IP ADDRESS RANGE HERE**
At **INSERT IP ADDRESS RANGE HERE** you would insert the range you would like your load balancers to use. For instance: 192.168.10.25-192.168.10.50 would give you 25 load balancer ip addresses. I save this as “metallb.yaml” and then apply it with “Kubectl apply -f metallb.yaml” (the -f stands for “file”)
Now lets test this out, cause whats the use in having fun tools is boring until you actually use it.
First lets run our favorite container, NGINX! Run the following to build a basic container:
kubectl run nginx --image=nginx
You can use “kubectl get pods --watch” to verify the pod gets to running. Once it shows “Running” under status, you can expose that pod to an IP address not connected to the Node using the LoadBalancer parameter. Expose your pod with the following:
kubectl expose pod nginx --port=80 --type=LoadBalancer
This exposes the pod with a load balancer port. You can see the information with kubectl describe svc -o yaml which will output the information for this service in yaml form. This is handy if you ever want to build multiple layers in your kubernetes manifest (For instance building an app pod with a LoadBalancer on creation).
Verify your app is now exposed on that ip address. For this just open a web browser and go to the LoadBalancer ip on the External-IP :

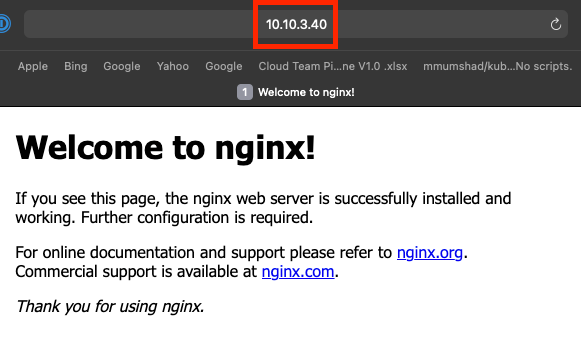
There you go! MetalLB exposing your applications publicly through yaml files, into an IP space. Pretty cool right?
