
So this is FAR overdue.. Sorry about that. In Part one we basically looked through setting up an AD structure for the computer object and setting the machine to install and join domain. Basic stuff really, but going from a purely manual build to this process pretty sweet. Here is the next part. IPAM, and the Network.
IPAM
There are a lot of solutions out there for IPAMs, from Solarwinds, to Infoblox the IPAM space has a lot of prospect. Some even use an excel spreadsheet right out of the 90s. Well, In all these prospects the built in Network Profiles of VRealize Automation can definitely make your life easier.
The research
The first thing you need to do is get a block of IP’s. Lots of different ways to do this. If your IPAM solution is extremely trusted you would go through that solution and reserve a block(depending on your resources for the VLAN, would determine the size of the block). From here you would need to go to VRealize portal to create your profile.
- From the login of the portal you will go to “Infrastructure” -> “Reservations” -> “Network Profiles” and click “New” -> “External”
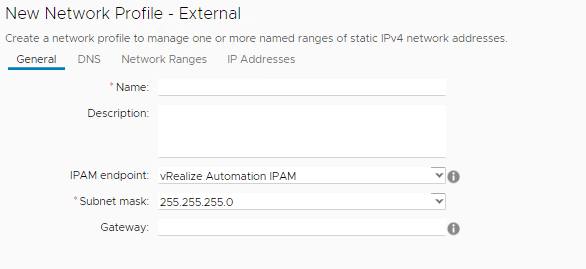
- From here you will create a Name for the profile(this will be used later). Description. IPAM endpoint for this will just be the internal IPAM. Select the proper Subnet mask from the drop-down and input the Gateway.

- On the DNS tab you will input the Primary and Secondary DNS, DNS suffix, DNS Search Suffices and any appropriate WINS inputs.

- Finally you will input you IP block. Inputting the Name, Description, Start IP and End IP.
- Next you will need to set this in the Reservations.
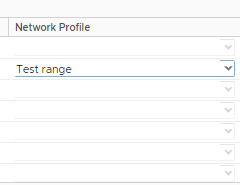
- On the Infrastructure tab go to Reservations, and select the reservation that will be using that profile. On the Network tab of the Reservation click the drop-down to select the newly created profile.
- Now Save your settings.
- Now you can go to Design and create a new blueprint to take advantage of your profile.

- On the blueprint Canvas to the left, select Network & Security and drag over Existing Network. This will put a new item on the canvas to go with your machine type.

- Click the “…” and select the profile that should be utilized for the machine.

- Now Click on the Machine Item and go to the Network Tab

- Select the same profile on the machine, and click OK
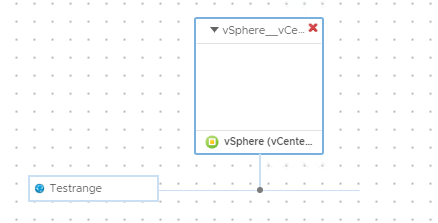
- You should now see a link on the machine, and that machine will not pull from that IP block for its IP settings.
Pretty awesome in my opinion and far superior to 5 custom properties. VMware has really done a lot to help engineers get the best out of their solution.
Now the next step follows what needs to be adjusted in your IPAM solution, weather that is to set the IP to a specific setting or call it and adjust some notes. This is specific to your environment and to your solution. I would suggest an extensibility subscription that runs on deployment/Destroy and adjusts as needed. Both Infoblox, and Solarwinds have good plugins for vRO along with custom API calls that can be utilized to solve these issues.
Thanks for reading! Hope this helps!
