
Each time I am talking to other operational mindset people about Kubernetes, I run into roadblocks in communication. After a lot of thinking, I started to imagine how I can help bridge the technical gap between operations and kubernetes. I decided to start a blog series on how to get started using one simple item; a raspberry pi. With this item, I’ll show how to create a single node kubernetes master that will allow pods to be deployed directly on it, and we’ll start building additional layers on the k8s platform, and I’ll also show how to build this as a cluster. I truly hope this is helpful to some or many, and can help you grow out of this into the kubernetes space. There really isn’t much outside of this stuff in the Enterprise space. Kubernetes really is just kubernetes wherever it is (public cloud etc.), some providers just abstract layers so that you can’t see parts of it. That’s pretty much it. With all that out of the way, lets get into the BOM.
As I am aware that there are MANY other blogs out there about how to do this, I’m just going to split this up into easy chunks that I *HOPE* help some. Here are other blogs that are better for pi’s:
https://ubuntu.com/tutorials/how-to-kubernetes-cluster-on-raspberry-pi#1-overview
https://alexellisuk.medium.com/walk-through-install-kubernetes-to-your-raspberry-pi-in-15-minutes-84a8492dc95a
I used Alex’s the first time I did this and definitely would recommend it, as I’m just notating things from myself doing this with kubeadm… We’re going to stretch as far as we can with kubeadm, but I predict that at some point I will be doing another blog where I’ve gone k3s and used Alex’s blog to do it.
For your BOM to get started you need the following:
- Raspberry Pi – I’m using a pi4 8GB, but I think you can get by with a 4GB. Since we’re using ubuntu it probably needs the additional horsepower.
- Power cable – Verify it’s a legit pi powercable, don’t scrimp on it.
- Video cable – microHDMI
- SD card for the OS – Micro, because things are small
- Another machine to flash the SD card – using etcher, or raspberrypi imager(below)
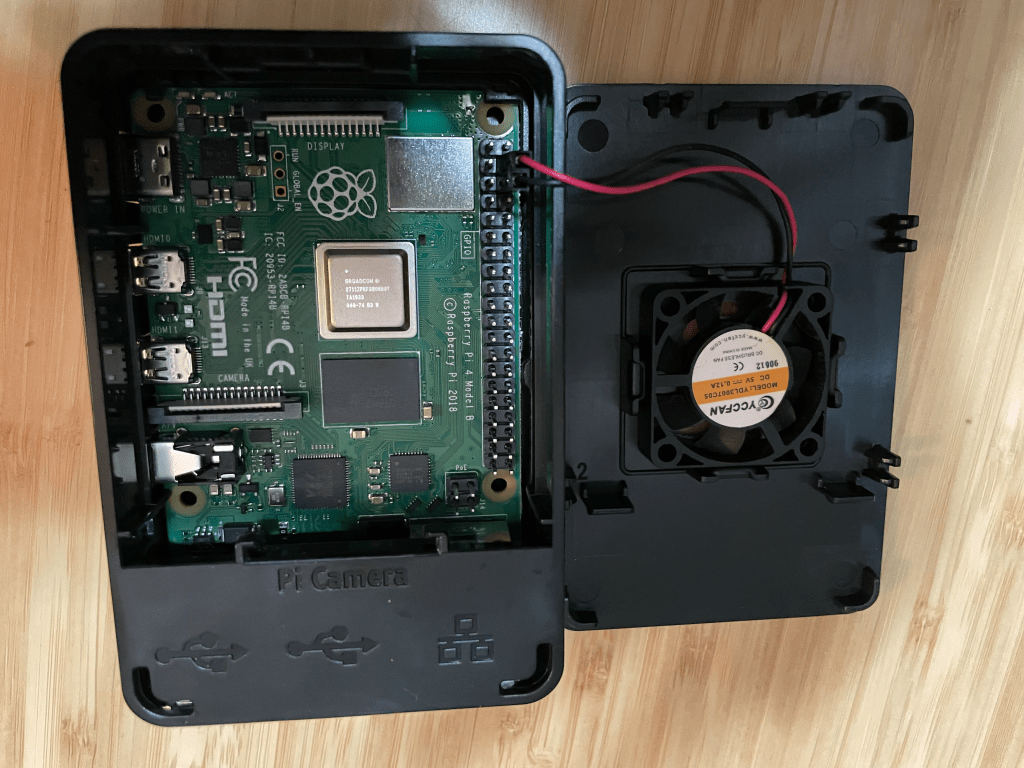
First things first: you need to setup your pie in its case (if you have one). I’ve been using CanaKit for a long time so I’ll be using their kit for this which includes a fan (if you have a fan picture to help find the jumpers to plug up into it.
Now, to flash your SD card with ubuntu using the raspberry pi imager found here: https://www.raspberrypi.org/software/ . With this running, you can install ubuntux64 server LTS edition. We don’t want the desktop and want to try to keep things as ‘lite’ as possible.
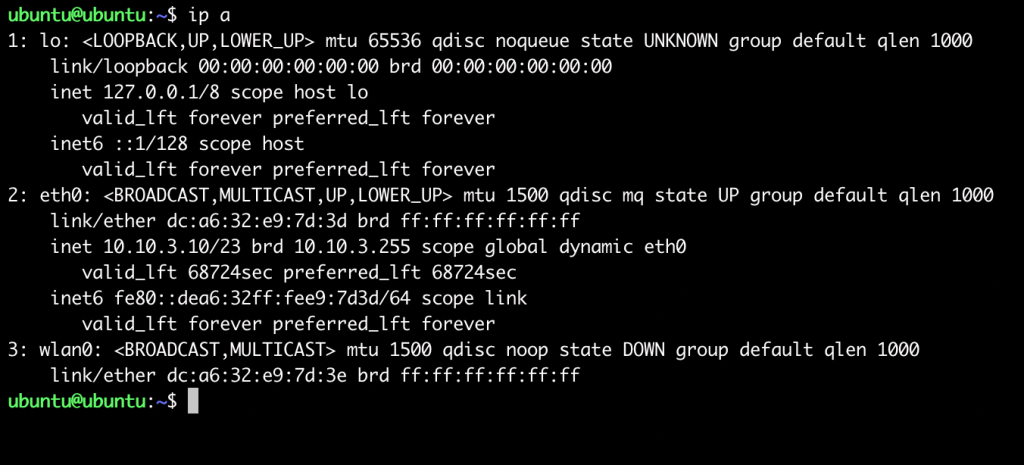
Once you have the machine up and running with the SD card, you need to pull the ip address. You will need to login to the machine using username “ubuntu” with password “ubuntu”. It’ll ask you to change the password, so do that. I normally just change it to “raspberry” or something easy, as I treat these machines as ephemeral boxes and flash SD cards quite often. Now run “ip a” This will give you the interfaces including the ip address, like so:
After this, you should be able to SSH into your raspberry pi with the ip address using the username “ubuntu”, and the password you set. SSH will help you perform these tasks as copy/pasting can help a lot.
This is a good point to change the hostname of the machine, especially if you’re going to cluster the machine to others as names must be unique. These steps are simply:
sudo hostnamectl set-hostname newNameHeresudo nano /etc/hosts
change “ubuntu” to a unique name, and then reboot.
Next, I just run my regular updates,
sudo apt update
sudo apt upgrade
Next open up the firewall, and set some network configs:
iptables -I INPUT -j ACCEPT
cat <<EOF | sudo tee /etc/modules-load.d/k8s.conf
br_netfilter
EOF
cat <<EOF | sudo tee /etc/sysctl.d/k8s.conf
net.bridge.bridge-nf-call-ip6tables = 1
net.bridge.bridge-nf-call-iptables = 1
EOF
sudo sysctl --system
The “sudo sysctl –system” should update the settings, if it doesn’t, run the lines until the 2nd “EOF”, then run the sudo command independently:
Using Docker
This walkthrough will be using Docker, but I’m going to do a different one with Cri-O later once I have those steps written up.
sudo apt install -y docker.io
Once installed, enable docker:
systemctl enable docker.service
You have to do a couple cgroup settings with raspberry pi, so let’s do those quickly:
cgroup="$(head -n1 /boot/firmware/cmdline.txt) cgroup_enable=cpuset cgroup_enable=memory cgroup_memory=1 swapaccount=1"echo $cgroup | sudo tee /boot/firmware/cmdline.txt
The Kube stuff
Now, you can follow kubernetes.io/docs for setting up a cluster with kubeadm. I’ll walk it through:
sudo apt-get install -y apt-transport-https ca-certificates curlsudo curl -fsSLo /usr/share/keyrings/kubernetes-archive-keyring.gpg https://packages.cloud.google.com/apt/doc/apt-key.gpgecho "deb [signed-by=/usr/share/keyrings/kubernetes-archive-keyring.gpg] https://apt.kubernetes.io/ kubernetes-xenial main" | sudo tee /etc/apt/sources.list.d/kubernetes.listsudo apt-get update (Updates repos with new google target)sudo apt-get install -y kubelet kubeadm kubectl (does the bizness)sudo apt-mark hold kubelet kubeadm kubectl (Keeps "apt upgrade" from touching these unless we want to do it ourselves"
REBOOT NOW!! Seriously reboot to ensure everything we’ve done take effect.
Ok, now if everything WORKED, then this next part will work… *fingers crossed*
sudo kubeadm init --pod-network-cidr=192.168.0.0/16
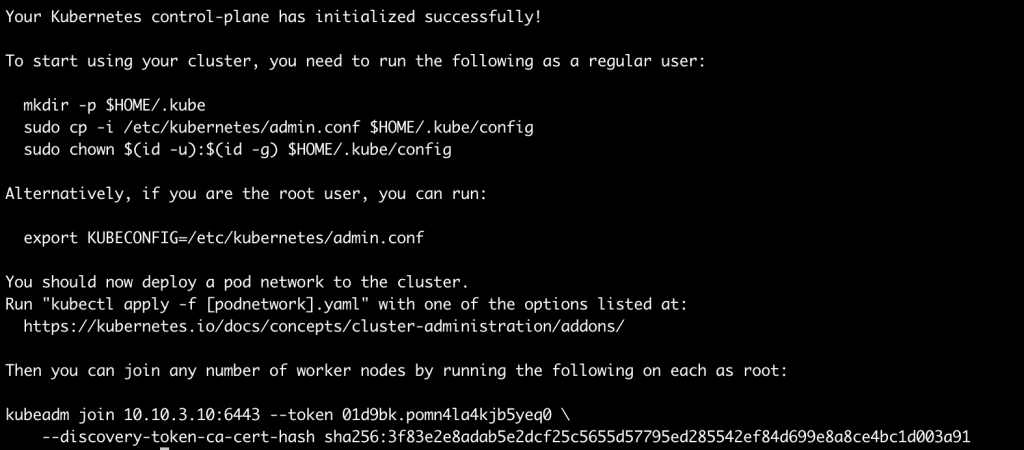
HUZZAH! Now, let’s dissect this information…
1st line is the line of joy that your control-plan is initialized.
“To start using your cluster,” – These lines move the config into a non-root user (such as ubuntu on this pi), the “export” command is for root.
Move admin.conf to local directory:
mkdir -p $HOME/.kube
sudo cp -i /etc/kubernetes/admin.conf $HOME/.kube/config
sudo chown $(id -u):$(id -g) $HOME/.kube/config
Finally:
kubeadm join 10.10.3.10:6443 --token <TOKENSTUFF> \
--discovery-token-ca-cert-hash sha<WHATEVERYOURSMAYBE>
This is the command to join a different pi to this control-plane to create a CLUSTER! Basically, follow this document up until the reboot, then run the above command to join a different pi to this pi instead of the “kubeadm init”.
NOW, because I want this to be the cheapest I can make it, let’s make this node a single node kubernetes box. Run the following to remove the taint from the master node, and take note of the dash at the end, as that REMOVES the taint. I’m using ‘–all’ so you can copy/paste. Don’t run this in a cluster, (OR do! – I’m not your boss, and pis are for learning!)
kubectl taint nodes --all node-role.kubernetes.io/master:NoSchedule-
Now, you have a non-ready cluster! WOOHOO! Time to select a CNI(Container Network Interface) but this time, lets just use Weave: Run the following!
kubectl apply -f "https://cloud.weave.works/k8s/net?k8s-version=$(kubectl version | base64 | tr -d '\n')"
NOW RUN “Kubectl get nodes”, AND SEE THE GLORY!


So, this has been a fun pi day blog for me, and I hope this helps you. Yes, you can write a bash script for this, and there may be one or two things in there that are not completely necessary. Pis are very low on resources, and though I’m using an 8GB module, it’s still limited. Still this is just a start to actually use it, Its like we just deployed ESXI and vcenter, and now we can deploy actual workloads.
I’m going to continue this as a series, so the next one will be using Cri-O instead of Docker, and then I’ll probably be running additional things from there as I can. I chose Kubeadm for this blog, because I’ve used this at work as well as at home, and it’s also how the CKA has you build a cluster. If you take that exam you can use this information to help you perform those tasks(up to a point). As always, please feel free to reach out to me on twitter if I missed something or something didn’t work for you. I’ll edit and update as needed.
HAPPY PI DAY!
