
So this is a blog series on how to setup and create quick deployments for self-service users in vRealize Automation. This is mostly built-in automation with minimal custom creations. This is pretty basic, but I wanted to start there and grow. I guess in that light I need to go over licensing and the architecture of building the automation as well. but for now, lets just say you have advanced licensing(at least) and your running a minimum to medium enterprise deployment this should work for you.
Should be fun, and maybe it will help someone out there.
*I’m going to assume the following.
- Endpoint agents are configured
- Resources are granted to specific business groups
- Entitlements are granted to said groups for appropriate services/catalog
That being said, here we go.
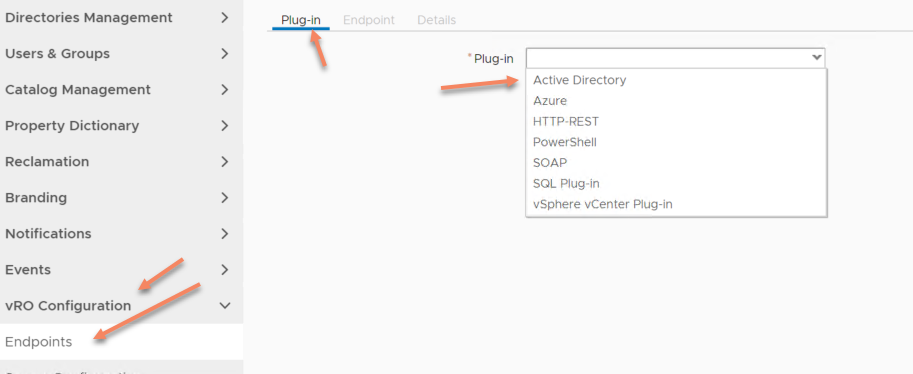
Deployment Step 1. AD Endpoint
First thing you will want to configure is your Active directory Endpoint. For this you will go to Administration -> vRO Configuration -> Endpoints. From here click “New” and on plugin you will select Active Directory policy.
From here you will input the Name and Description of the endpoint, then the following details for the server. For now, we’ll use ldap connection. Input the host/ip at the top, baseDN, Default Domain, username/password. If failover, round-robin, or Single-server drop-down and add the DC’s to the array below. Finally add the Name for vRO and the final two options aren’t too needed for adjustment. Below is an example of how it should look.

Active-Directory Policy
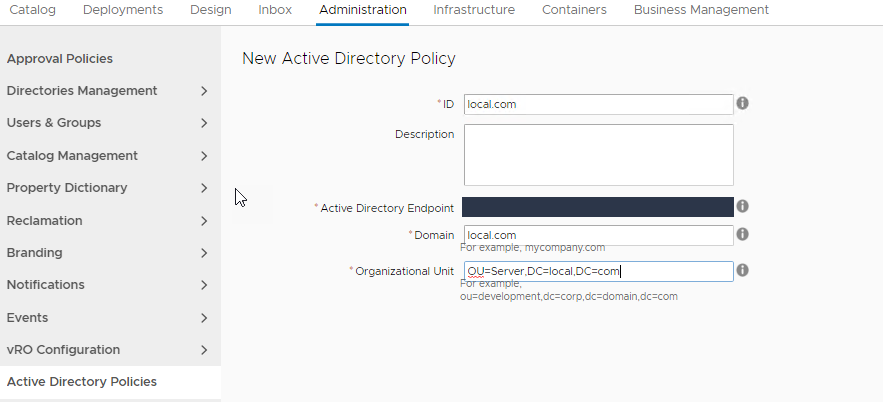
This is specifically for users who need the computer to drop to a specific OU. To find this on vRA you would go to Administration->Active Directory Policies (If the option does not exist you may be missing some roles on your vRA account). From there you can click “New” which will open up your settings. Here you select the ID(Remember for later),endpoint, domain, and OU you wish the policy to put the Policy.
Now you have an endpoint, and a policy. How do you add it to the blueprint?
The custom property ext.policy.activedirectory.id is your go to there. Below is a screenshot that will explain how to associate the policy with the blueprint.

This will create the computer object before the deployment starts and will remove it upon destruction. Nice Self-Service.
Now how do I verify the computer name doesn’t exist?
Create an Action in vRO to find it!
Action in vRO for Checking Computer Name
Set you vRO to Design, and on the cog, you can create an action.
Return type = String
Inputs
- strComputer – string
- defaultADServer – AD:AdHost
Code:
var computers = ActiveDirectory.getComputerADRecursively(strComputer,defaultADServer);

if(computers[0] == null){

return "This name is available"

}

else

{

return "This name is unavailable"
Place this as a external action on the blueprint against the “Hostname” Custom property(basically the name that the VM will take). This return “This name is unavailable” if it finds anything close to the name, However, this does not stop the request going through. For that you can do a Match field with another Text Field of “This name is unavailable”. Which should only let the request go through if it states “This name is unavailable”
Hope this helps someone get things rolling! I’ll do a blog on Network Profiles next.

One response to “VRealize Deployments: Part One, Active Directory Policy”
[…] https://nerdynate.life/2019/01/13/vrealize-deploymentsplaceholder/ […]
LikeLike